Instead of doing a big year-end post like most folks, I'm into looking forward this year. 2011 was fine, sewing-wise; I made three bed-sized quilts, lots of progress on my Aunt Millie's project, and had several small finishes. The problem is, I didn't really do anything new, and I still have a couple unfinished and neglected projects hanging around my head.
This recent realization about my lack of sewing progress has led me to think about what I want to be doing. There are so many answers to this question, I don't even know where to begin. So I won't try (not here, anyway).
I recently saw 365: A Daily Creativity Journal in a bookstore and became intrigued. I've always found the 365 projects admirable, but unapproachable. They seem constraining and keep a punishing pace; what if you fall behind?! But the accountability of these projects is appealing. They set an expectation about what will be done, and when. This is a lot different than making as you go-- it's pretty easy to leave an unfinished project in the closet for eternity, especially when there's no deadline to finish.
I'm not promising to undertake some kind of 365: Sewing challenge. Like I said, I find those projects to be too regimented and maybe even impossible to accomplish. Instead, I plan on setting small, manageable goals for each month of 2012. Posting them here will give me the accountability that I appreciate and the short time line will be motivating and approachable.
Here's hoping this process will be motivating, not taxing. Stay tuned for my January goals.
Saturday, December 31, 2011
Friday, December 30, 2011
Name Books
You wouldn't believe it by reading the internet, but making handmade gifts for babies is difficult! Most of what I find on the web (that's something cute and something I would actually want to or could make) is for toddlers. So this year, I was wracking my brain, trying to think of something to make for Daniel and Nickolas (last written about here).
Then, I went shopping with my girlfriend, Karina. We talked about soft books and Daniel's incessant desire to chew on things. We talked about how many baby gadgets Daniel owns already. We talked about how Karina didn't purchase any books for Christmas. Enter my bright idea!
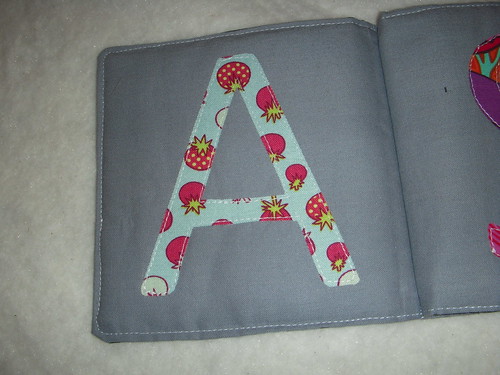
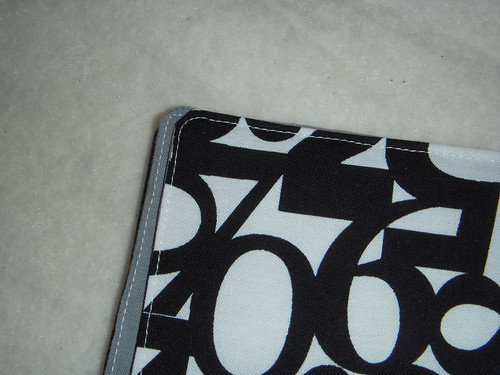
Faithful readers, I give you the name book. This personalized book measures about 5" square and is made entirely of scraps, including some of my precious Jay McCarroll stash. Each page is dedicated to one letter of the child's name. I tried to choose bold, bright prints for my letters, and I'm pretty sure I was successful.
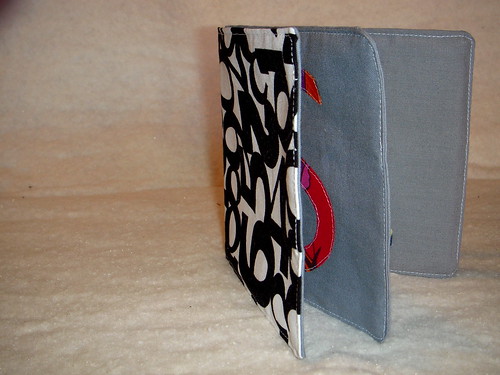
I used an iron-on adhesive in order to attach the letters to the page and top-stitched around each one for durability. In order to keep this book truly soft and satisfyingly puffy, the pages are stuffed with fusible fleece. Every page is neatly top-stitched.
These name books are based on an alphabet instruction concept commonly known to instructors of early and emergent readers. When learning letters, it's a great idea to start with a child's own name, since those are the most interesting letters of all (it turns out that reading your own name is pretty motivating)! Many teachers will help students create alphabet books using a child's name (and the names of their family or classmates) to help enforce alphabet recognition.
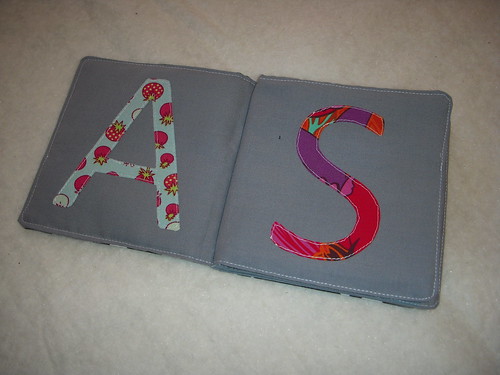
Books like this are excellent toys because not only do they enforce letter recognition, they enforce print concepts, too! When children play with books (and when we read to them), they learn that books start with a cover, that letters are found on the page, that we read from left to right. Although this book is a little simple, it's a great introduction to print concepts like turning pages and seeing print on a page.
Although I made a soft name book for Nickolas and Daniel both, what you see in this post is a custom product created for a client. Okay, not a client. Karina asked me to make one for a coworker as a Christmas gift, and I obliged (And then she obliged by paying me. Cha-ching!).
I have future plans for other soft books and am considering creating a tutorial and pattern with templates for the name book and others. Any interest?
Then, I went shopping with my girlfriend, Karina. We talked about soft books and Daniel's incessant desire to chew on things. We talked about how many baby gadgets Daniel owns already. We talked about how Karina didn't purchase any books for Christmas. Enter my bright idea!
Faithful readers, I give you the name book. This personalized book measures about 5" square and is made entirely of scraps, including some of my precious Jay McCarroll stash. Each page is dedicated to one letter of the child's name. I tried to choose bold, bright prints for my letters, and I'm pretty sure I was successful.
I used an iron-on adhesive in order to attach the letters to the page and top-stitched around each one for durability. In order to keep this book truly soft and satisfyingly puffy, the pages are stuffed with fusible fleece. Every page is neatly top-stitched.
Books like this are excellent toys because not only do they enforce letter recognition, they enforce print concepts, too! When children play with books (and when we read to them), they learn that books start with a cover, that letters are found on the page, that we read from left to right. Although this book is a little simple, it's a great introduction to print concepts like turning pages and seeing print on a page.
Although I made a soft name book for Nickolas and Daniel both, what you see in this post is a custom product created for a client. Okay, not a client. Karina asked me to make one for a coworker as a Christmas gift, and I obliged (And then she obliged by paying me. Cha-ching!).
I have future plans for other soft books and am considering creating a tutorial and pattern with templates for the name book and others. Any interest?
Monday, December 19, 2011
Drawstring Backpack
Long time, no see! There's been lots of sewing but not a lot of blogging going on these past few months. I'm not pressuring myself to blog, or have lots of followers, or be high-profile enough to receive a free Panasonic 360 Cordless Iron to review (like everyone else). Instead I'm just quietly going about my business, meeting with my stitching group weekly (they're more awesome than a free cordless iron), and sewing on whatever projects I want.
Recently, my school hosted our annual holiday celebration and silent auction. In the past, I've offered whatever fun teacher-activity the PTA asked me to do. This year, I suggested my own donation: a sewing lesson/workshop. The winner had two project choices: drawstring backpack or the Keyka Lou Camera Case Wristlet.
The auction was won by the super-sweet Abigail, daughter of an awesome colleague. She chose to work on a drawstring backpack and insisted that the bag include a zippered pocket-- cue Noodle Head's drawstring backpack tutorial (thanks, Amy!).
This tutorial is great! I'm not a bag-sewer and three-dimensional objects are often out of my league. I had to read through it a couple of times to get comfortable with the process, but once I started working it was smooth sailing. Although it took me a minute to get comfortable sewing in 3D, this tutorial is simple and straightforward, and easy enough to make with a beginning sewer. And the bag is cute! And lined! And has a fully finished zipper pocket! To me, this is all very impressive; it doesn't seem like any of that should be easy, but it was.
After I made my practice bag, I invited Abigail over for an afternoon of sewing. She loves purple, so I pulled a gorgeous purple Alexander Henry print from my stash. Instead of using cording for the drawstrings, I purchased some pre-made double-fold bias tape in a coordinating color. Before she arrived I cut the fabric pieces needed for construction and prepared the zippered pocket portion (for the sake of simplicity). I also marked seam lines along each piece for Abigail to follow as she sewed.
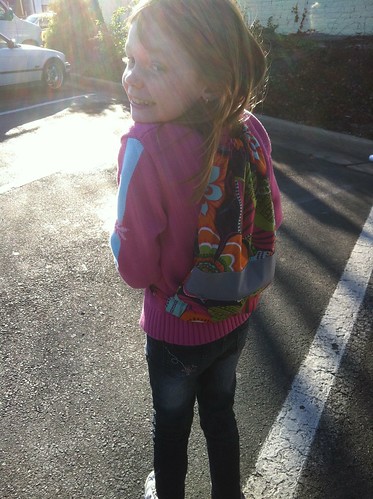
Abigail was very excited to sew and got the hang of operating the machine right away. We sewed several lines on scraps to practice guiding the fabric without pushing or pulling, and then began construction on the bag itself. She did a fabulous job! Clearly, this chick is a natural. Her bag turned out pretty much perfect, despite some mistakes made by (and fixed by!) yours truly.

I've got to say: I'm extremely proud of this bag. Not only was I able to successfully create a bag, but I was able to successfully help an 8-year old do it! I feel extremely accomplished and I know Abigail does, too. She even asked if we could sew together again!
Recently, my school hosted our annual holiday celebration and silent auction. In the past, I've offered whatever fun teacher-activity the PTA asked me to do. This year, I suggested my own donation: a sewing lesson/workshop. The winner had two project choices: drawstring backpack or the Keyka Lou Camera Case Wristlet.
The auction was won by the super-sweet Abigail, daughter of an awesome colleague. She chose to work on a drawstring backpack and insisted that the bag include a zippered pocket-- cue Noodle Head's drawstring backpack tutorial (thanks, Amy!).
This tutorial is great! I'm not a bag-sewer and three-dimensional objects are often out of my league. I had to read through it a couple of times to get comfortable with the process, but once I started working it was smooth sailing. Although it took me a minute to get comfortable sewing in 3D, this tutorial is simple and straightforward, and easy enough to make with a beginning sewer. And the bag is cute! And lined! And has a fully finished zipper pocket! To me, this is all very impressive; it doesn't seem like any of that should be easy, but it was.
After I made my practice bag, I invited Abigail over for an afternoon of sewing. She loves purple, so I pulled a gorgeous purple Alexander Henry print from my stash. Instead of using cording for the drawstrings, I purchased some pre-made double-fold bias tape in a coordinating color. Before she arrived I cut the fabric pieces needed for construction and prepared the zippered pocket portion (for the sake of simplicity). I also marked seam lines along each piece for Abigail to follow as she sewed.
Abigail was very excited to sew and got the hang of operating the machine right away. We sewed several lines on scraps to practice guiding the fabric without pushing or pulling, and then began construction on the bag itself. She did a fabulous job! Clearly, this chick is a natural. Her bag turned out pretty much perfect, despite some mistakes made by (and fixed by!) yours truly.
I've got to say: I'm extremely proud of this bag. Not only was I able to successfully create a bag, but I was able to successfully help an 8-year old do it! I feel extremely accomplished and I know Abigail does, too. She even asked if we could sew together again!
Subscribe to:
Posts (Atom)