- Get started on the FFAII quilt
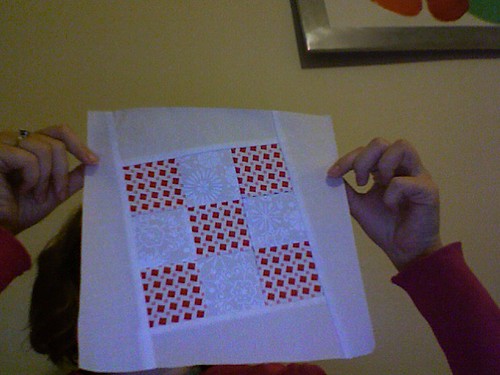
- Finish Hocuspocusville #4
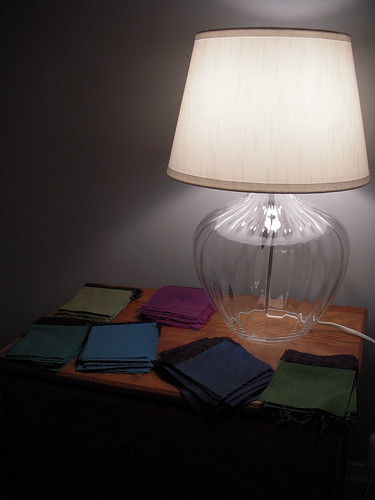
- Make a couple of zipper pouches
- Experiment with fabric
Showing posts with label what i'm working on. Show all posts
Showing posts with label what i'm working on. Show all posts
Thursday, March 1, 2012
Sewing Goals - March
Because of February's drudgery, I tried some looser, more exciting goals. Wish me luck!
Wednesday, February 29, 2012
February Sewing Goals - Recap
I can't believe it's already time to review this month's sewing goals. View February's list here. The final list is as follows:
Overall, this felt like a to-do list rather than a list of goals I wanted to accomplish. These maintenance tasks really killed my motivation, especially since there wasn't a whole lot of actual sewing involved.
So what did I learn?
I learned that I need actual fun sewing in order to be motivated. A bunch of tiny sewing-related tasks does not sewing make. They all felt like chores and everyone knows how much I hate obligation sewing. As a result, my mind wandered to projects and possibilities that weren't even remotely related to my goals for the month. Never again.
Additionally, I learned that it's easy to kill your momentum on a project by not allowing enough freedom. I think I did this to myself by focusing on all the same projects from last month. The only one I remained excited about was Hocuspocusville, but I didn't feel that I could continue to work on it after meeting my goal because the rest of the list was looming over my head. Then, I came to resent the projects that needed to be worked on, even though I was previously excited about them in January.
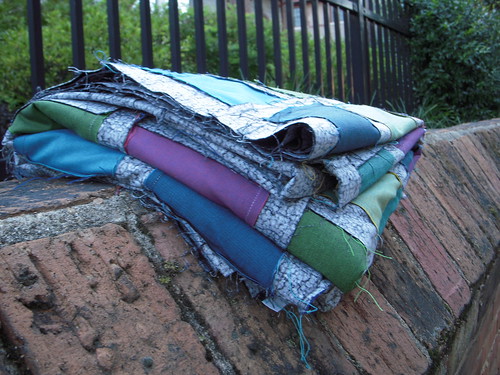
Lastly, I learned that it's disheartening to achieve a goal, but not in the way I'd imagined it. The 36-patch backing is technically prepared, though it's not what I'd envisioned. I really struggled with meeting my goal versus meeting my vision for the project. The need to strike that item off the list and get the whole thing to the quilter was pretty great. However, the dissatisfaction with the whole thing was even greater. Was it fair to say I had met the goal without having met my vision? Sadly, these ideas all apply to the Christmas 9-patch, too. Safe to say that these projects need to rest for a while.
February has been a tough month. Perhaps the worst part of it all was that I met the letter of my goals without meeting the spirit. I'm looking forward to what March has to offer.
prepare backing for the 36-patch quilttrace Hocuspocusville #4piece the Christmas 9-patch quilt topplan the grid and finalize block numbers on the wedding quilt
Overall, this felt like a to-do list rather than a list of goals I wanted to accomplish. These maintenance tasks really killed my motivation, especially since there wasn't a whole lot of actual sewing involved.
So what did I learn?
I learned that I need actual fun sewing in order to be motivated. A bunch of tiny sewing-related tasks does not sewing make. They all felt like chores and everyone knows how much I hate obligation sewing. As a result, my mind wandered to projects and possibilities that weren't even remotely related to my goals for the month. Never again.
Additionally, I learned that it's easy to kill your momentum on a project by not allowing enough freedom. I think I did this to myself by focusing on all the same projects from last month. The only one I remained excited about was Hocuspocusville, but I didn't feel that I could continue to work on it after meeting my goal because the rest of the list was looming over my head. Then, I came to resent the projects that needed to be worked on, even though I was previously excited about them in January.
Lastly, I learned that it's disheartening to achieve a goal, but not in the way I'd imagined it. The 36-patch backing is technically prepared, though it's not what I'd envisioned. I really struggled with meeting my goal versus meeting my vision for the project. The need to strike that item off the list and get the whole thing to the quilter was pretty great. However, the dissatisfaction with the whole thing was even greater. Was it fair to say I had met the goal without having met my vision? Sadly, these ideas all apply to the Christmas 9-patch, too. Safe to say that these projects need to rest for a while.
February has been a tough month. Perhaps the worst part of it all was that I met the letter of my goals without meeting the spirit. I'm looking forward to what March has to offer.
Wednesday, February 1, 2012
Sewing Goals - February
Here we go, the second month of my so far extremely productive adventure. What can I accomplish this month?
- prepare backing for the 36-patch quilt
- trace Hocuspocusville #4
- piece the Christmas 9-patch quilt top
- plan the grid and finalize block numbers on the wedding quilt
You'll notice I skipped a step with the Christmas 9-patch. I don't need to finish the rest of the blocks, because I already did it! Okay, all but, like, six. Easy-peasy. The rest? We shall see...
Friday, January 20, 2012
PrOgress
Things are going pretty smoothly with the January sewing goals. I've accomplished a couple and worked on all of them!

I thought I would regret setting these goals, but I really don't. The goals give me direction for what to work on; having set multiple goals ensures that I have plenty of direction, even after having achieved one of my sewing objectives. The decision of what to sew is already made for me; no more listless pondering required. Also, having an agenda makes me more likely to sew and more likely to finish a project. Lastly, the blog posts have created some sense of accountability-- people are checking in on my progress!
I don't know that I will be 100% successful on this month's goals; even so, I've already enjoyed a considerable amount of success! It feels good to say you're going to do something and then get it done. I know that I will definitely do goals again in February.
Here's a picture of some of the progress I've made on my Hocuspocusville block; since last night I've stitched that whole area including branch, cat, and part of the trunk. I'm ready to attack the treehouse tonight!
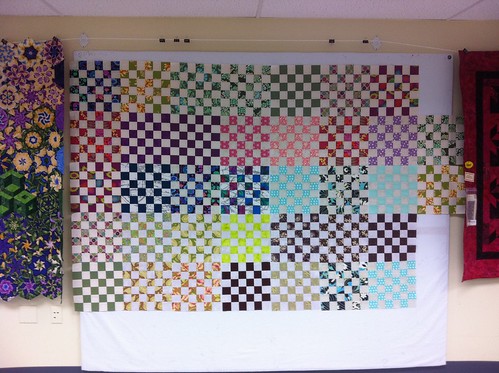
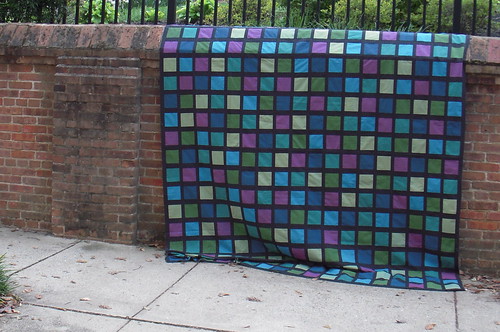
There's the final layout of my 36-patch quilt. Yes, that is my classroom floor. I brought the blocks to school with me today so that I could finally work on the layout-- it was the only place I knew with a large enough surface to lay out all of those blocks!
* * *
Often, when feeling the desire to sew, I'm left with no direction because there are so many projects to work on. I will stand listlessly in front of the sewing closet, unable to decide what to work on. Sometimes I will even set up materials and equipment only to put it all back in the closet without even having sewn a stitch.
I thought I would regret setting these goals, but I really don't. The goals give me direction for what to work on; having set multiple goals ensures that I have plenty of direction, even after having achieved one of my sewing objectives. The decision of what to sew is already made for me; no more listless pondering required. Also, having an agenda makes me more likely to sew and more likely to finish a project. Lastly, the blog posts have created some sense of accountability-- people are checking in on my progress!
I don't know that I will be 100% successful on this month's goals; even so, I've already enjoyed a considerable amount of success! It feels good to say you're going to do something and then get it done. I know that I will definitely do goals again in February.
Saturday, December 31, 2011
Moving Forward
Instead of doing a big year-end post like most folks, I'm into looking forward this year. 2011 was fine, sewing-wise; I made three bed-sized quilts, lots of progress on my Aunt Millie's project, and had several small finishes. The problem is, I didn't really do anything new, and I still have a couple unfinished and neglected projects hanging around my head.
This recent realization about my lack of sewing progress has led me to think about what I want to be doing. There are so many answers to this question, I don't even know where to begin. So I won't try (not here, anyway).
I recently saw 365: A Daily Creativity Journal in a bookstore and became intrigued. I've always found the 365 projects admirable, but unapproachable. They seem constraining and keep a punishing pace; what if you fall behind?! But the accountability of these projects is appealing. They set an expectation about what will be done, and when. This is a lot different than making as you go-- it's pretty easy to leave an unfinished project in the closet for eternity, especially when there's no deadline to finish.
I'm not promising to undertake some kind of 365: Sewing challenge. Like I said, I find those projects to be too regimented and maybe even impossible to accomplish. Instead, I plan on setting small, manageable goals for each month of 2012. Posting them here will give me the accountability that I appreciate and the short time line will be motivating and approachable.
Here's hoping this process will be motivating, not taxing. Stay tuned for my January goals.
Thursday, August 11, 2011
Sewing Machine
I have sworn off all forms of virtual bees, swaps, and quilt alongs for 2011. Most of you reading probably already know this. Over the past couple years, I have found that those types of activities suck all the fun right out of sewing. It goes back to that quilting with obligation thing, no?
But, I’m a sucker for plain-old, straight-up, old-fashioned patchwork. Especially if it's made of cute little squares. If it's cute little squares, I’m there.
Which is how I find myself in a contradiction.
I’m sure you’ve seen the 36-patch quilt-along over at Crazy Mom Quilts. And you see how I might be enticed. Those blocks are adorable. Not only are they adorable, but they are also easy. Strip-piecing? Check.
Make no mistake: I am not quilting along. So let’s just get that straight. I am, however, making 36-patch blocks because they are cute. I’m not going to stay on any kind of schedule or add photos to the flickr group, because those are the things about quilt-alongs that stress me out. Instead, I’m going to be inspired by Amanda Jean’s idea and I’m going to make some sweet, traditional patchwork blocks.
Now that’s out of the way.
I am strip piecing these blocks using fabric from my stash: one neutral and one print. As of now, I am at a standstill because I am out of neutral fabrics! That’s really too bad, considering I was on a roll; so far, I’ve got 37 blocks complete, and that’s after only three (four?) sewing sessions.
I used the Robert Kaufman QuiltCalc to figure out how much yardage I’ve used. (It’s pretty easy to do this using the “pieces to yardage area” calculator.)
Sessions one and two yielded a combined 10 blocks (six strips per block, 2.5” x 16.5”, 60 strips in all) and used a total of 2 1/8 yards of fabric from my stash.
Session three (and four?) spanned two days and yielded 27 blocks! That eliminated another 5 5/8 yards of stash fabrics.
Total destruction? 7 ¾ yards of stash busted and I’m already nearly halfway to a queen-sized quilt top.
It’s okay; you can clap.
Saturday, July 16, 2011
Aunt Millie's Update 5
I'm smoking on this project! Not only have I finished another block, but I also remade the center medallions for all the previous blocks and sewed them on. Like I said, I'm smokin'!
This block was quick, easy, and fun to make. A few of the fabrics in the kit weren't to my taste, so Kristal passed along some batiks to substitute. The batiks add some charm. I will definitely be doing some substitutions on block six because some of those unfortunate fabrics have repeated themselves.
Speaking of Kristal, we went to Quilter's Corner today where I found the perfect dot for upcoming scrappy hexagon project. More on that later.
Speaking of Kristal, we went to Quilter's Corner today where I found the perfect dot for upcoming scrappy hexagon project. More on that later.
Block Six, coming up!
Tuesday, July 5, 2011
Aunt Millie's Update 3
Here are the photos of my currently finished blocks, from beginning to end. See my previous post for hand applique tips.
I purchased the pattern and a kit for each block in this project. Additionally, I attended one group meeting (and paid the class fee) dedicated to this block of the month. Each kit was $19.99; I also purchased a finishing kit that includes materials for the appliqued border and patchwork sashing. Let's just say I've sunk several dollars into this project, and so no matter how tedious it becomes, I must finish it!
The first block took me about a year to finish. I did use the freezer paper method for this block, which probably took quite a bit of extra time. In retrospect, this method doesn't create any better results than plain ol' turning under.
I've come quite far; when I look at that block, I want to redo it! All those points made me crazy, but of course it gave me quite a bit of practice in making nice points. Additionally, I attached some of the pieces out of order because I wasn't paying attention. I haven't fully decided if I will redo the block, but it is nice to compare this block to the others and to see how far my skills have come.
The second block was never photographed and today I only took one; perhaps that is a subconscious way of saying I don't really care for it? I do like the block, but only a little. Perhaps I will like it more after I redo the center medallion (more on that later). Can you see how much nicer this block is than the previous?
I finished this at the prodding of the ladies in my sewing group; they really helped reignite my excitement for this project. It's only because of them that I'm on my current finishing streak! Hopefully they'll keep me excited about it. (Do you like how I'm giving them all the responsibility for making sure this project is finished?)
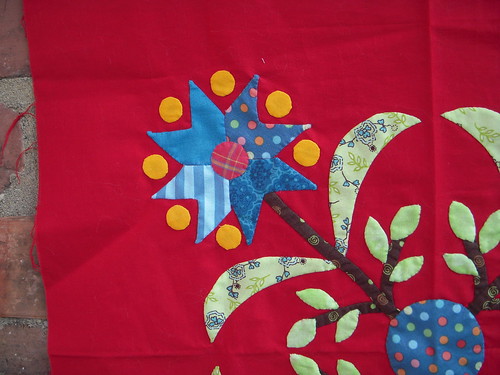
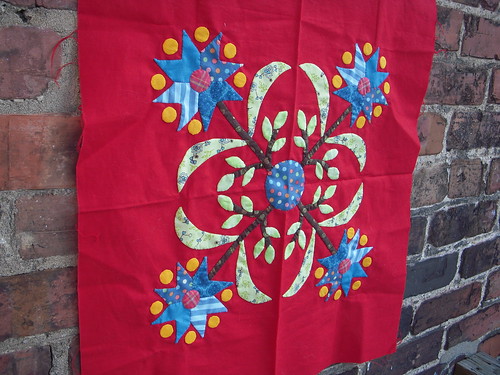
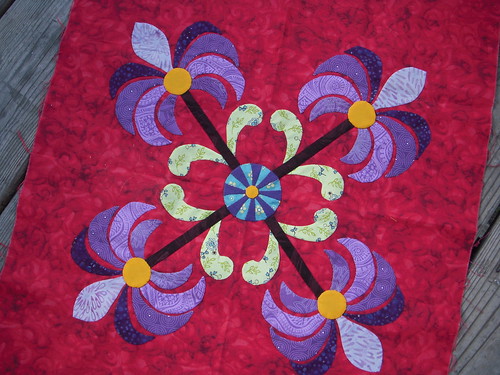
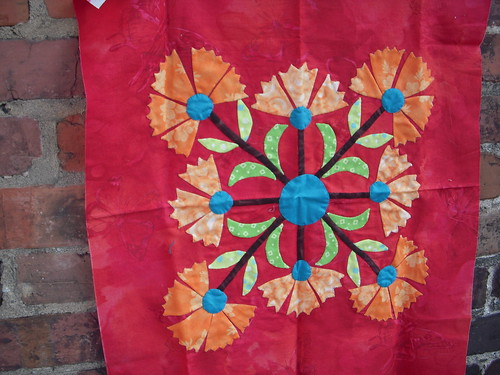
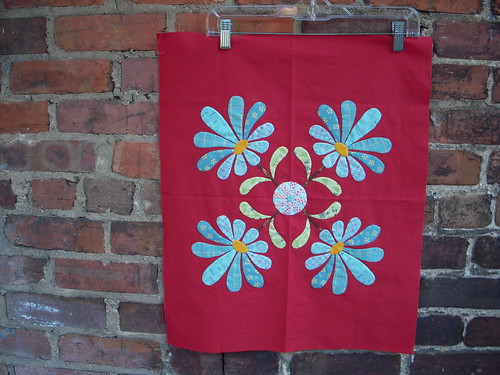
The project sat for quite a bit before I began the third block. This one is probably my favorite so far; I love the little yellow dots all around the flower heads and although I waffled about sewing them on (I was feeling burnt out), I'm glad I did.
I deviated from the original pattern to make things just a bit simpler for myself. Each flower head is supposed to be composed of eight petals; instead, I joined the petals together to create four, preserving the shape but removing the complication of perfectly lining up eight pieces. The overall design doesn't suffer-- it's still plenty cute!
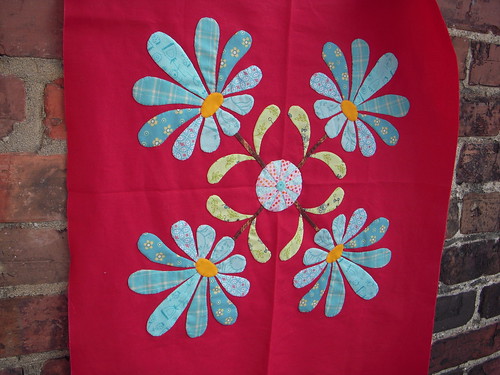
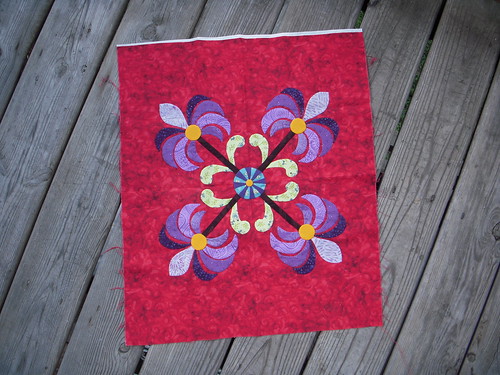
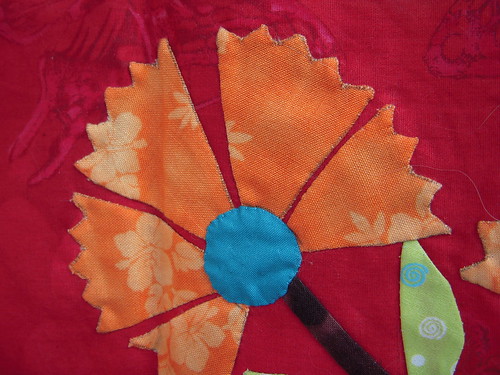
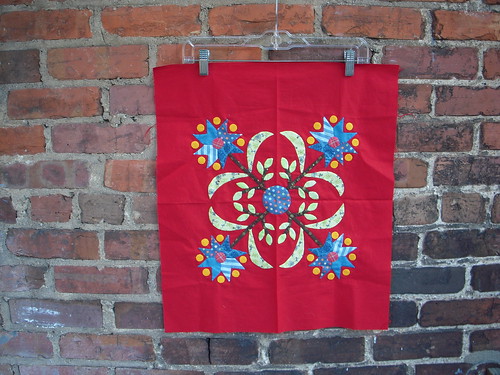
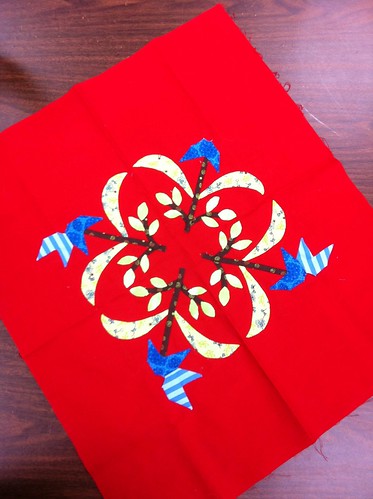
The fourth block was completed in only about a week's time. I did some of the sewing on my honeymoon-- in the airport on the way home, duh-- but finished it over the past weekend. The petals here are absolutely beautiful and they were fairly simple to applique because they are large and have gentle curves. I did have some difficulty when appliqueing the centers to the flowers-- I wasn't able to easily cover all raw edges-- but some pushing, stuffing, and stretching solved all that.
This block has the beautiful appliqued center medallion, unlike the others. Although the striped center medallion looks cute, it was not easy nor simple to make. (More on that later.) Despite its time-consuming difficulty, I will definitely be doing the other blocks to match. Perhaps not right away, but over the course of this project.
When comparing the first block to the most recent, the difference in skill level is obvious. My hands may turn arthritic and gnarled, but I will be an applique expert when I finish this project (someday). Overall, I am enjoying the applique experience. Perhaps later I won't say the same thing, but for today I am quite satisfied. I can't wait to finished the next block-- another simple one with large pieces and curves-- and see the fruit of my newfound skills.
Aunt Millie's Update 2
As we speak (type), I have finished exactly four-- count them!-- Aunt Millie's Garden blocks. The first I finished in summer 2010. The second was finished sometime between then and now; I'm unable to pin a timeframe on that one because I never even took pictures of it until now. The third and fourth were finished two weeks ago and last week, respectively.


The vinyl overlay method has been slow but much less tedious than using freezer paper or hard plastic templates. I don't follow this exact process, but at least that link gives you some idea of how I applique.
1. Less seam allowance is more. It's scary to trim a scant seam allowance when doing applique because one slip and you've wrecked your piece. Also, fraying is a concern. However, I've found that smooth curves are easier to create with less seam allowance, and there is also typically less fraying because you have less fabric you are trying to turn under.
2. Use the lightest marking pencil tint possible. Early on I used a black marking pencil. The line markings are just visible on the edges of those pieces, and it makes all the applique look very dirty around the edges. Currently, my tint of choice is pink. It is working out really well.
3. Pulling stitches too tightly makes them more visible. At times, when we tighten our hand stitches they disappear into the fabric. During the course of this project, I've noticed that sometimes tightening stitches makes them more visible, rather than less. Take care not to pull too tightly, otherwise you will get a ruffly edge around your piece, and the finished product will not be as smooth as you'd like.
4. Using a light box to trace is much more helpful than tracing on the window or using the television. I recently purchased one for myself. More details coming soon.
5. Trimming and snipping leads to crisper points. Points, of course, suck. Ugly points suck even more. It has been much easier to create satisfactory points by trimming and snipping at the vertices, then folding and tucking. I snip right up to the point, just a few threads from the fold line. Then, I tuck and fold the seam allowance in, trimming extra where necessary. If I had five hands I could take a video or pictures and show you.
6. Sew right to left. I am right-handed, and sewing right to left makes it much easier for me to turn and sew, turn and sew. Perhaps southpaws should sew in the opposite direction?
7. One thread does not fit all. There is not a universal color that will work with all fabrics-- if the thread does not disappear just right against the fabric, then the stitches are visible and that is crazy-making. And before you tell me to try that invisible thread stuff, know this: it is impossible to get a good knot with invisible thread.
Tuesday, June 7, 2011
Aunt Millie's Update
I spent some more time today working on my third Aunt Millie's Garden block. Surprisingly, I'm making some progress! Pardon the lack of contrast on the photo above, but that's my block. Since taking that pictures I have appliqued the second petal into that final quadrant.
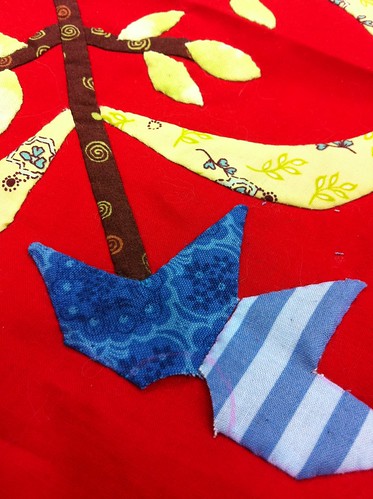
This is what my applique looks like close up. It looks much better from far away! Although I have appliqued what feels like a million pieces at this point, I am still not that great at it. My curves are not always smooth, and many times my points are still extremely bulky (and sometimes not that pointy).

This block calls for 8 petals in each flower head. I decided to combine the petals into four groups of two in order to make things simpler on myself. This way, I trace two petals as if they were one, and applique them in place. Because I am using different fabrics, I still have a scrappy look. But, because I have fewer pieces, I have less concern to perfectly line the petals together, and less worry that there will be too little or too much space around the petals.
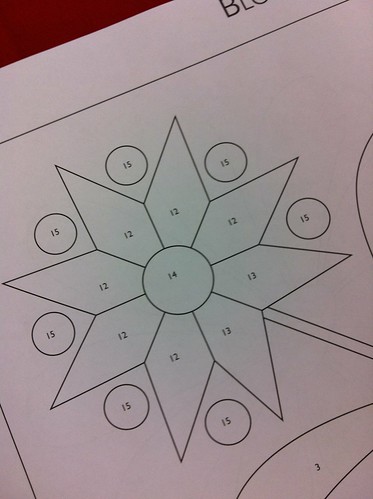
Is that cutting corners? Is cutting corners bad? Honestly, I think it looks just as cute, and I can't bear the thought of appliqueing 32 pointy little pieces after all those leaves. Not to mention all the circles I have to fuss with next...
Sunday, June 5, 2011
Aunt Millie's Garden
Not much is going on around here. We're just chugging along until we get to the wedding, which is in three weeks!
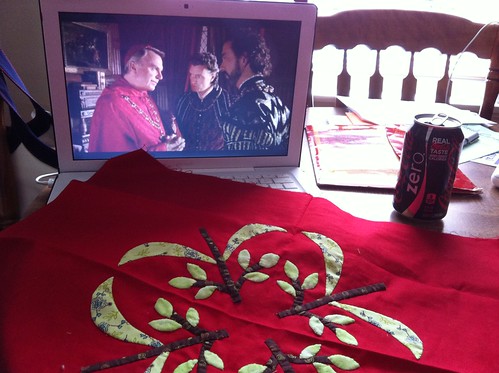
Life has been stressful (to say the least) around here, so lately I've been trying to just relax. Today was especially relaxing; I spent a good part of the day working on the third Aunt Millie's Garden block and watching The Tudors on Netflix (see photo above). Have you seen this show? Every other scene shows someone in flagrante delicto, to steal a phrase from the show. Very spicy!
I also applied some retail therapy last and this weekend. Can you believe I was able to find almost the entire line of Punctuation by American Jane? This is one of those lines that I always wish I'd bought but never did. Today, I rectified that situation and bought 15 prints for my stash. I don't usually stash, and although I was tempted to purchase every fabric available for a complete set (gotta catch 'em all!), I bought only the prints I truly loved. Best thing? I had a gift certificate, so it cost me considerably less than it might have.
By the way, if you're wondering about the quilt giveaway, you're going to have to keep wondering. I'm not ready to announce yet. But I promise you'll be the first ones to know when I do!
Wednesday, May 4, 2011

Tuesday, April 5, 2011
Wedding Quilt Update #1
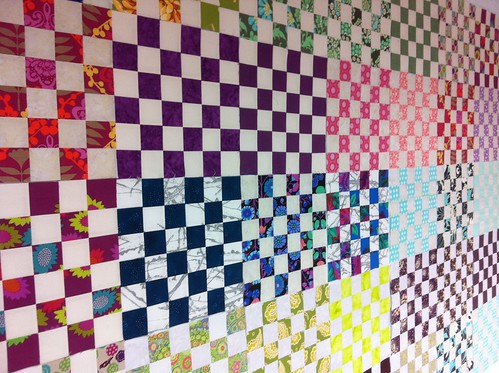
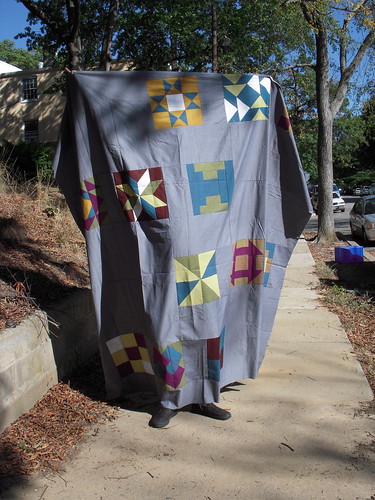
Things are chugging right along on the wedding quilt. I can't believe that I am lucky enough to have friends willing to do such a special thing for and with me. Check out all the stars hanging on Kristal's design wall!

I must admit that most of those stars are from Kristal, but a few of them are mine! If you roll over the above photo in flickr, I've made a note about which blocks are mine.
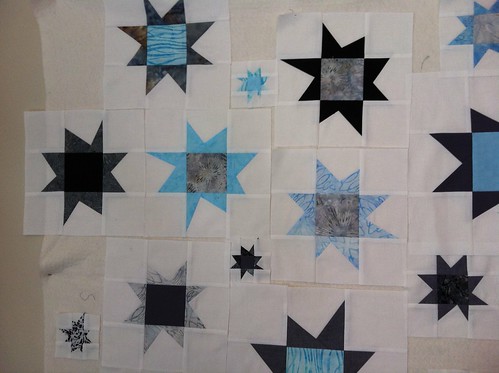
It seems like a lot, but it's not really much, or at least that's what everyone else is saying. This is supposed to end up a queen sized quilt-- as of right now Kristal maintains that we've only got enough for a crib sized quilt.
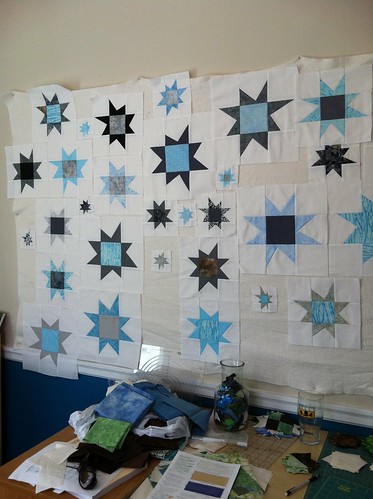
No big deal, though, because I am really enjoying making these blocks. I've dug into my stash for grays-- I hoarded a million a couple years ago during Fat Quarter Frenzy at Quilting Adventures-- and am trying not to mooch too many beautiful batiks from Kristal. I've had to buy a few blues, and have swapped a few, too.
The wonky star is much easier to make than I thought it would be. Now that I've done several I hardly have to think about the process anymore. Of course, that's how I've always felt about "improv"-- it's not as improvisational as everyone would have you think. There's actually a fair bit of planning and consideration that goes into it. Or maybe that's just my brain. Thoughts?
I must admit that most of those stars are from Kristal, but a few of them are mine! If you roll over the above photo in flickr, I've made a note about which blocks are mine.
It seems like a lot, but it's not really much, or at least that's what everyone else is saying. This is supposed to end up a queen sized quilt-- as of right now Kristal maintains that we've only got enough for a crib sized quilt.
No big deal, though, because I am really enjoying making these blocks. I've dug into my stash for grays-- I hoarded a million a couple years ago during Fat Quarter Frenzy at Quilting Adventures-- and am trying not to mooch too many beautiful batiks from Kristal. I've had to buy a few blues, and have swapped a few, too.
The wonky star is much easier to make than I thought it would be. Now that I've done several I hardly have to think about the process anymore. Of course, that's how I've always felt about "improv"-- it's not as improvisational as everyone would have you think. There's actually a fair bit of planning and consideration that goes into it. Or maybe that's just my brain. Thoughts?
Tuesday, March 22, 2011
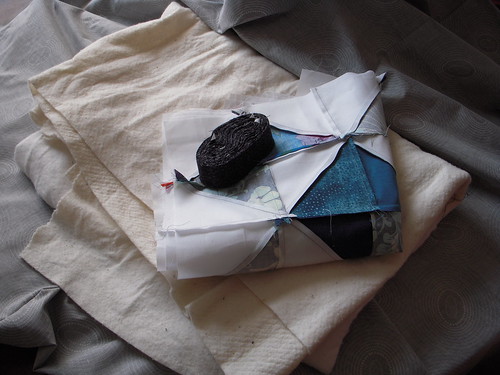
Sew Productive
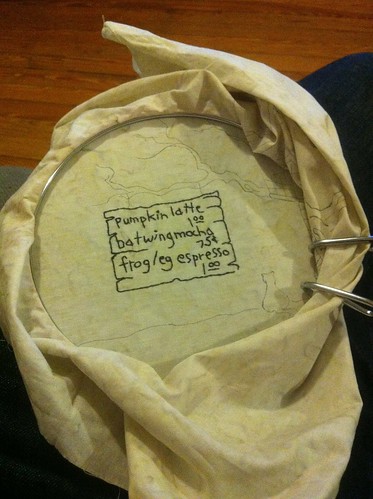
Behold, some ingredients for a quilt! It's what I'm working on. And really, I'm almost finished! Best of all? Almost everything in this quilt was from my stash or someone else's-- including the batting!
Tuesday, November 16, 2010
Christmas Future
That's really what my Christmas quilt is right now-- a ghost of Christmas Yet to Come. It will not be done in time for this Christmas. It will, however, be amazingly cute and festive. I think it's worth the wait. And when it's finally finished, I will throw open the windows and yell down into the street, "You, there! What day is it?" Upon finding out that it is Christmas Day, I will purchase a huge turkey for Tiny Tim and his family. Then I will become a beloved old man and a legend of classic literature.
Until then, these off-kilter nine-patch blocks.
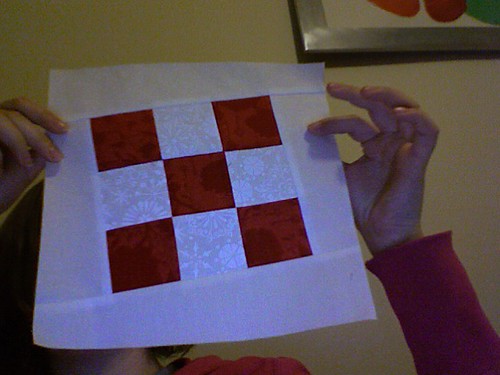
Until then, these off-kilter nine-patch blocks.
Saturday, October 9, 2010
Quilt Top Sweat Shop
Today's session of Quilt Top Sweat Shop was very successful. I finished the Opulence quilt top today! It looks pretty good, if I do say so myself. Though I am usually against pinning, I was vigilant about it this time. All my corners and rows are perfectly matched!
I laid the finished top over my bed to see how big 98" x 89" really is. Well. It's big. This quilt will be a very generous queen making it perfect for use as a bedcover.
Unfortunately, the pictures are kind of terrible. I'm not sure how Cherri does it. Houston must be a much prettier city than Richmond, because I can never manage pictures as beautiful as Cherri's.
Sunday, October 3, 2010
Opulence, I has it
You know this commercial? It goes right along with my current quilting project-- both the concept and the person!
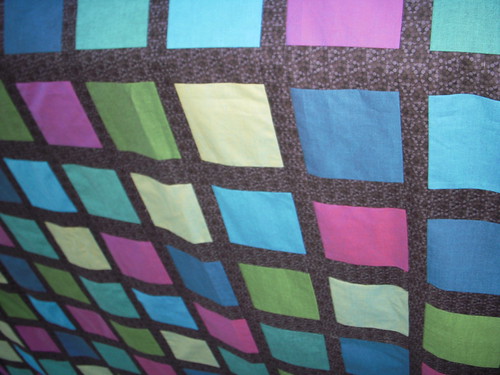
The colors for this project were supposed to be "rich" and "royal"-- the types of colors preferred by the recipient. I chose the Carolina Chambrays by Robert Kaufman because they have such a rich quality to them. The iridescent shimmer created by the cross-woven fibers, the silky-smooth texture, and the jewel-toned colors all scream expensive without actually being that expensive. ("Opulence, I has it. But I also like savings the money...")
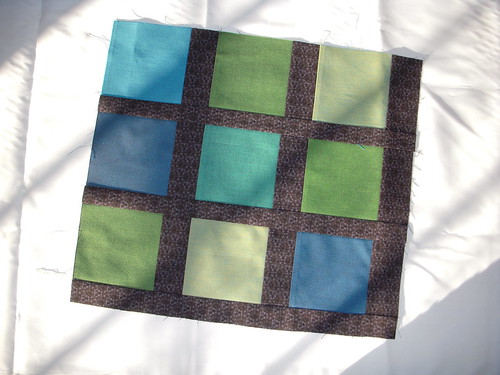
Here are some sneak peek photos of one of the first blocks I've made for the completed quilt. My layout inspiration for this project comes from Cherri House's quilt City Green. The pattern is published in Cherri House's new book, City Quilts.
In order to keep track of which squares belong where, I have devised an ingenious labeling system. Because my layout is 18x18 squares, I decided to sew my patches together into blocks of 9 squares-- how easy! Each row on the y-axis was labeled with a number 1-18. The x-axis was a bit more complicated. I lettered the patches in threes-- the first three were "A," the next "B," and so on. This way, when I stacked my squares, I knew that row A1 was to be the first three blocks on the first row of the quilt. Row B1 would be the next three blocks in the first row. A2 and B2 would be the three blocks directly below A1 and B1. To get my first block, I would have to sew A1-3 together-- 9 patches in all. Make sense?
Anyway, it's coming together nicely, and I better get off blogger and onto the machine. I have to drop everything off for the quilter to pick it up Oct 8-- that's Friday, in case you were wondering. Quilt top sweat shop here I come!
The colors for this project were supposed to be "rich" and "royal"-- the types of colors preferred by the recipient. I chose the Carolina Chambrays by Robert Kaufman because they have such a rich quality to them. The iridescent shimmer created by the cross-woven fibers, the silky-smooth texture, and the jewel-toned colors all scream expensive without actually being that expensive. ("Opulence, I has it. But I also like savings the money...")
Here are some sneak peek photos of one of the first blocks I've made for the completed quilt. My layout inspiration for this project comes from Cherri House's quilt City Green. The pattern is published in Cherri House's new book, City Quilts.
In order to keep track of which squares belong where, I have devised an ingenious labeling system. Because my layout is 18x18 squares, I decided to sew my patches together into blocks of 9 squares-- how easy! Each row on the y-axis was labeled with a number 1-18. The x-axis was a bit more complicated. I lettered the patches in threes-- the first three were "A," the next "B," and so on. This way, when I stacked my squares, I knew that row A1 was to be the first three blocks on the first row of the quilt. Row B1 would be the next three blocks in the first row. A2 and B2 would be the three blocks directly below A1 and B1. To get my first block, I would have to sew A1-3 together-- 9 patches in all. Make sense?
Anyway, it's coming together nicely, and I better get off blogger and onto the machine. I have to drop everything off for the quilter to pick it up Oct 8-- that's Friday, in case you were wondering. Quilt top sweat shop here I come!
Sunday, September 26, 2010
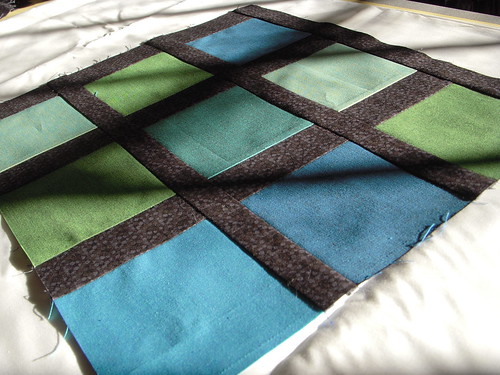
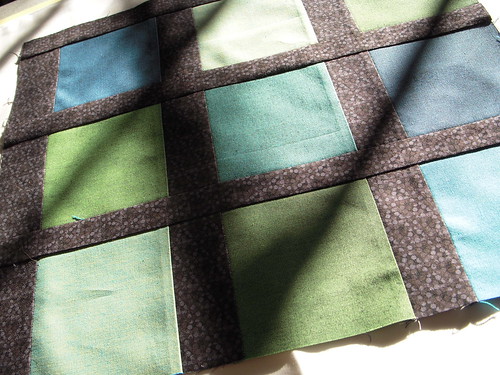
Sneak Peek!
I've been working on the layout for a very special quilt today. Since I don't have a design wall in this teeny tiny apartment, I stripped all the sheets off my bed and used the bare mattress as the design wall. The nightstand worked perfectly as a prep table for my cut patches.
The fabrics are Carolina Chambrays from Robert Kaufman. They are a pain to cut (the fabric never stays square!) but they look gorgeous. All fabrics in this top will be chambrays with the exception of the sashing, which is the black Razzle Dazzle dot from Timeless Treasures.
Here's hoping I can work on this all week and finish up next weekend. Then, I can send it out to the longarm quilter and get it back with plenty of time before Christmas. Cross your fingers for me!
Monday, September 20, 2010
Modify Tradition
Finally! I have completed my sampler quilt top from Modify Tradition Round 1. This top sat in a drawer for quite a long time, ignored and forgotten, and-- dare I say-- unloved!
I like it much more having seen it sewn together. I didn't love my blocks from the first round-- I blame that one some of the fabric choices I made. But, the money was spent, and starting over would be costly, so I continued with the original plan.
The quilt top is quite large-- 90"x90". That is why the picture is so terrible; even Josh couldn't hold it up so I could see the whole thing.
I set my blocks in four rows of three, with wide horizontal sashing. The rows alternate justification to the left and right and overlap just a bit in the middle. Fabrics include some Robert Kaufman Carolina Chambrays; the background fabric, in particular, comes from this fabric line.
Thankfully, I have several 50% coupons from Joann's, and so I will be purchasing several yards of fabric and batting for this quilt. I have decided to undertake the perilous task of quilting this myself. It will be my largest self-quilted project to date. We will see how that goes...
Tuesday, July 27, 2010
Seeing Spots
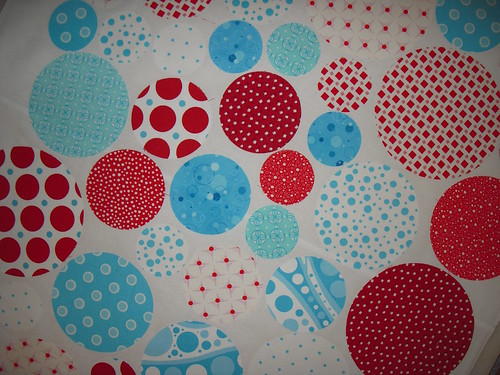
I finally started my DQS9 project; my partner hasn't posted much-- maybe once or twice-- but I think she will like this! My partner has a lot of bright colors in her favorites, and almost everything she seems to love is on a white background.
Personally, I've been obsessed about dots lately. I even consider stashing every time I see a dot I like. Today I bought 17 dot prints. Don't judge me.
I used the die-cutter at Quilting Adventures to cut four circles from twelve prints. Then, I laid them out when I got home. They're stuck on with spray adhesive; I didn't want to mess with fusible this time around. Last time I had a hard time stitching through the fusibles. Of course, I won't do hand stitching this time, but it was nice to skip the extra step and cost of iron-on fusible.
Subscribe to:
Posts (Atom)